Hate Mornings? Try a DIY Sunrise Alarm Clock Using Smart Lights

Princess Anna was onto something when she said, “The sky’s awake, so I’m awake.” Due to circadian rhythms, the inverse is also true. When the sky is asleep, people generally want to be asleep. Because of this, even if you’re a morning person, it can be difficult getting up in the morning during winter when the dark is glaring in through your windows.
Sunrise alarm clocks were developed as a means of combating this. A set duration before your scheduled alarm, the clock’s light will turn on at its dimmest setting. It will gradually brighten in an artificial sunrise that eases you out of sleep. When your alarm goes off, you’ll wake up to a lit room.

The only downside is the cost. Cheaper options are available, but these don’t have a smooth sunrise cycle. They will often be one hue rather than mimicking the multiple hues of a natural sunrise. Plus, instead of gradually fading to brightness, they will become brighter in incremental jumps. There are also complaints about the cheaper sunrise alarm clocks not lighting up a room as thoroughly as some of the other options. For a good sunrise alarm clock, you would be looking at $100+. You can make a DIY sunrise alarm clock using smart lights as a less expensive alternative.

Choosing Your Smart Lights

Smart lights can connect to your phone, smart hub, or smart speaker. You can remotely control them from an app or voice commands. You can also schedule times to automatically turn them on and off.
When you create your DIY sunrise alarm clock using smart lights, you will want to get at least one light, which you can put in a lamp. However, for the best experience, you will want to put smart lights in your bedroom’s overhead light fixture. If the light fixture has a dimmer switch, you will want to convert it to a regular switch before using smart lights. Otherwise, the light will flicker and make a buzzing noise.

For a lamp, you may run into problems if you try using a touch-activated lamp, but if you use a lamp with multiple brightness settings, you can turn it on to the highest setting after installing your smart light, and you should be fine.

Smart lights come with a broad range of features and capabilities. For your DIY sunrise alarm clock, you will at least want to find a light with a fade-in feature that you can schedule to fade to full brightness over an extended duration. To optimize your sunrise alarm clock more fully, get color-changing lights. Ideally, you will find bulbs capable of fading through a color cycle that you set while simultaneously becoming brighter.

If you want to connect your smart lights to your smart home hub or smart speaker, you will want to check for compatibility as you research different bulbs. Keep in mind that the device you use to connect to your smart lights will need to be connected to Bluetooth or the internet for your DIY sunrise alarm clock to work as scheduled. If you generally turn your phone on airplane mode at night, you will want to start using do not disturb instead. However, unlike many regular sunrise alarm clocks, a power outage won’t throw off your programming.

Programming Your Artificial Sunrise

Image of someone holding a smartphone.

Most sunrise alarm clocks have a 30-minute cycle. You can copy this or choose a different duration as you create your DIY version. For purposes of this article, we’ll use the 30-minute model, and you can adjust as needed for what you decide is best for you. There are two main methods you can choose between when creating your sunrise.

Sunrise Simulation

The most accurate way of simulating the sunrise involves using the light tones in a natural sunrise. This is the method the top-ranked sunrise alarm clocks use. They start with a red-toned light at the lamp’s dimmest setting. As the light progressively gets brighter, the light fades through shades of orange and then yellow. By the time it reaches its brightest setting, the light takes on the hue of natural daylight.

To recreate this with your DIY sunrise alarm clock:

1. Familiarize yourself with your smart light app.

The exact process will vary based on the brand of light you selected, but this guide will walk you through the general idea.

2. First Schedule

Create a new schedule starting 30 minutes before your alarm will go off with a light that fades from red to orange over ten minutes and increases from 0% to 33% brightness.

3. Second Schedule

Create a second schedule starting twenty minutes before your alarm with a light that fades from orange to yellow over ten minutes and increases from 33% to 66% brightness.

4. Third Schedule

Create a third schedule starting ten minutes before your alarm with a light that fades from yellow to daylight over ten minutes and increases from 66% to 100% brightness.

5. Set to Repeat

Set the schedule to repeat on the days you want it to.

If your bulb isn’t able to fade between colors, you can manually create a fading effect. Start with the color set to red. Then, create a new schedule with a shade of red closer to orange and so forth as you work your way through the sunrise cycle. The more schedules you program, the more natural your sunrise will feel. You will want ten minutes of red and shades that get closer to orange. Then, have ten minutes of orange and shades that get closer to yellow. Next, have ten minutes of yellow that get closer to daylight. Finally, set your lights for daylight when your alarm goes off.

These may sound like intensive processes, but most smart light apps are easy to use, and once you create your sunrise schedule, you never have to do it again. If it’s still more work than you want to do, there is an alternative. You won’t get the natural shades of sunrise, but it’s easier to set up.

A Simplified Sunrise

Image of a Google Nest Mini

For a simplified sunrise, pick one light color or a white tone. Then, set it to fade from 0% to 100% over 30 minutes, reaching the brightest setting when your alarm goes off. Do you have a Google Nest? There is a built-in feature where you can say, “Hey Google, turn on Gentle Wakeup.” It will automatically set your smart lights to fade to full brightness over the 30 minutes before your scheduled alarm.

Whichever method you decide to go with, you no longer have to wake up to darkness in the winter. With your DYI sunrise alarm clock using smart lights, you can always wake up to sunrise for easier, brighter mornings.

How to Give Kids Access to the Alarm System

The debate of how old kids should be before they get a smartphone is as old as smartphones themselves and isn’t going away any time soon. Perhaps you’ve decided the best decision for your family is to wait until the kids are older before getting them smartphones. If you have a security system with an app, you’ll need to ensure your kids have the access they need without a smartphone. There are several ways to give kids access to the alarm system that don’t involve the app.

1. Control Panels

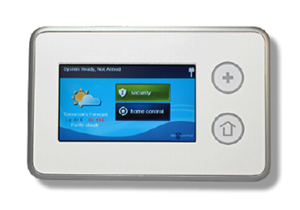
In many cases, the easiest solution to give kids access to the alarm system may be to have the kids use the main control panel for arming and disarming the security system. You can simply move the control panel to the door they use most. What if you prefer to use the main control panel over the app? It’s more readily accessible than the extra steps of pulling out your phone and navigating to an app. If that is the case and depending on the setup of your home, having the kids use the main control panel may not be the ideal option.

Chances are, you have the control panel by the garage since you primarily go out this way, and the kids use the front door the most since they walk home from school and friends’ houses. Whenever they get home, they would need to hurry across the house to where the control panel is and disarm the alarm before it goes off. As a simpler alternative, you could keep the main control panel where you want it for you and add a secondary control panel somewhere more accessible for the kids.

2. Wireless Keypad

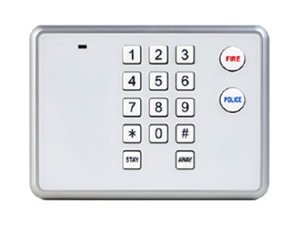
A wireless keypad is a simpler version of a secondary control panel. It doesn’t have as many controls as the main and secondary control panels. However, if you only need to give your kids easy access to basic arming and disarming of the alarm system, this could be a good option for you.

3. Wireless Key Fob

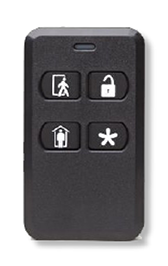
This option is like your car’s key remote. Four simple buttons on the wireless key fob give the user access to the alarm system’s key features—arm system in away mode, arm system in stay mode, disarm, and a siren. For some, this would be the ideal level of convenience. There’s no need to position additional panels in easy-to-access locations or punch in codes when your kids can do it at the press of a button. Of course, you’ll need to determine if this is a good option for your family. If you have a kid who constantly loses things, getting them another small thing to misplace might not be the best route.

Perhaps you could say designing the perfect home security system is almost as subjective as the decision of when to get cell phones for your kids. That’s why WISE Home Solutions offers customizable plans, making it possible to get everything you want and nothing you don’t need. If you would like additional information on how we can help you design the perfect home security system for you and your family, contact us at 844-904-9473 or request info online.

Sci-Fi Technology You Can Add to Your Smart Home Today

In 1865, Jules Verne’s From the Earth to the Moon was well received by audiences. At the time, it was fanciful and utterly impossible. One hundred four years later, man first set foot on the moon. What was once science fiction had become a reality. From this and the other events of the Space Age stemmed more fanciful ideas for futuristic technology. People incorporated these into the science fiction of that day and the decades that followed. In some cases, technology didn’t develop as quickly as the hopeful creators had predicted (Back to the Future fans are still wondering where those 2015 hoverboards are). In other cases, technologies found in sci-fi set centuries from now exist in some form today, such as a few of those found in the 23rd and 24th centuries in Star Trek. We might not have the starships and warp technology needed to travel the final frontier easily. We do have versions of  some Starfleet technologies in our current frontier, though. Here is some sci-fi technology you can add to your smart home today.

“Computer, Increase Ambient Temperature by Two Degrees Centigrade.”

When Star Trek first came out, controlling a computer with a mouse was a new technology. Meanwhile, Star Trek and other stories introduced the sci-fi technology of a computer that could respond to voice commands. The main computer was also integrated with the other systems. Crewmembers could tell the computer to adjust the temperature, turn off the lights, play music, and other things in addition to operating the starship.

Today, we have voice command computers. However, instead of referring to them as “computer,” we call them “Alexa,” “Google,” and “Siri.” A smart speaker with a virtual assistant isn’t entirely the same as a ship-wide computer, but if you set it up correctly, you can get close. Start by choosing a smart speaker to serve as your smart home hub. You could even put smart speakers in multiple rooms for a more immersive experience. Once you have your speaker(s), connect your smart thermostat, smart lights, smart locks, home security system, and other technology. With an integrated smart home system, you can have all the control of a Starfleet captain over your home without leaving the atmosphere.

“Tea, Earl Grey, Hot”

The idea of a replicator is fascinating. You can go up to a terminal and ask it for a cup of tea, and it will make one for you. No need to bring your own cup. The replicator will make that, too. We’re still a ways off from this, but one could argue that we’ve entered the early stages of this sci-fi technology. We can take an intangible computer file and use it to create a tangible object with a 3D printer. Even though you can’t replicate a cup of tea, you can replicate a cup.

As 3D printing technology has been progressing, it has become more affordable and more accessible. There are easy-to-use home 3D printers available. Many libraries offer 3D printing services for patrons who want to utilize this new technology but don’t have their own 3D printer. For those without experience in 3D design, premade files for printable objects are available, often at no charge, through websites like Thingiverse.

“Computer, Begin Program”

In Star Trek, a holodeck is a room that can become a 3D simulation of anything. The simulation isn’t bound by the room’s dimensions since the simulation moves with the user. It can be the ultimate training program or the most immersive video game in the galaxy.

Nowadays, we are starting to see more of this level of immersion through virtual reality technology. VR uses stereoscopic displays to create the illusion that the user is in the VR world rather than looking at it. VR treadmills make it possible to move around in the VR world as though you are really there. Additional physical props can further enhance the experience. Though there are still kinks developers are working out and affordability issues, VR is on its way to becoming the holodeck of reality. Between these and other developing technologies, we are well on our way to more of yesterday’s science fiction becoming today’s reality.

You Need Carbon Monoxide Detectors

Carbon on its own is safe and even vital to life. On the other hand, when something breaks down to form molecules of one carbon atom combined with one oxygen atom, this creates a substance that is colorless, odorless, tasteless, and toxic. No, not Iocane powder, though carbon and oxygen combined could also defeat someone in a battle of wits. Rather, it forms a gas known as carbon monoxide (CO).

The Silent Killer

When someone inhales carbon monoxide, it displaces the oxygen in the victim’s body, which can lead to oxygen deprivation and death. Since people can’t detect carbon monoxide on their own and it’s easy to confuse the symptoms of CO poisoning with flu symptoms, it has earned the nickname ” the silent killer.” You may not know you have carbon monoxide poisoning until it’s too late.
The first step of combating a danger is to know where it comes from. In the case of carbon monoxide, it’s more common than you may think. CO is a byproduct of combustion, so anything that uses combustion as an energy source can produce CO. If you have any gas-powered appliances, indoor fireplaces, a gas furnace, or a gas water heater, you have sources of CO in your home. Most of the time, these devices are safe, and vents carry any dangerous gasses out of the home, but if there’s a leak, you have a problem.

Protecting Your Home

If CO is undetectable to people, how do you know if there’s a leak? You get something that can detect it. The Consumer Product Safety Commission recommends installing carbon monoxide detectors on each floor of a residence and outside sleeping areas. When installing your detectors, it is commonly recommended to place them on a wall about five feet above the floor. Don’t install them near windows, in humid areas like a bathroom, in direct sunlight, or by fans and vents.

After you’ve installed your carbon monoxide detectors, they aren’t something you can set and forget. You will want to test and clean them regularly according to the manufacturer’s instructions, and it is generally recommended to change the batteries every six months. If you forget, your detector will beep to remind you. Some detectors have a different pattern for if the alert indicates a battery reminder or a leak warning. Learn how your detectors work so you can know the difference.

Beep!

Your carbon monoxide detectors went off in the middle of the night, and it’s not the battery reminder sequence. There’s a CO leak. It’s what you wanted to protect yourself against but hoped you would never have to deal with. What do you do now?

1. Get all people and pets out of the house. This will ensure you are in a well-ventilated space with fresh air.
2. Call emergency services and report that the alarm has gone off.
3. Do not reenter the house until the emergency responders have declared the premise safe.

How to Prevent People from Hacking Smart Home Devices

If you’ve watched enough spy movies, you’ve probably seen both the good guys and the bad guys hack into computer systems, tap into cameras, deactivate security devices, and other means needed to accomplish their aim without getting caught. Their methods are dramatized for cinematic purposes, but real-life hackers can achieve similar results. Your home probably isn’t a fortified base holding an artifact critical to a mission. However, the real-life hackers may still see it as a target. As one cyber security expert put it, “If it’s digital, it’s hackable.” We surround ourselves with digital technology, and some hackers find ways to take advantage of this by hacking smart home devices.

What Hackers Do

It starts with finding something to hack. Many hackers will use network scanning tools to locate devices. They would then execute various strategies to gain access. Once they’ve accessed one device on the network, it’s easier to hack into others.

They might access the indoor cameras to watch what’s happening inside a home. Finding it empty, they could decide to investigate further. By accessing the smart thermostat, they’re able to see the temperature is set lower than the usual of previous weeks, suggesting that the residents could be out of town. The hacker keeps an eye on the home. When they conclude they’re right about the home being vacant, they decide to take advantage of it. First, they access the cameras, ring doorbell, and alarm system and disconnect them from the Wi-Fi to deactivate them. Then, they tap into the smart locks and let themselves in. When the residents come back from their vacation, they find they’ve been victims of a home robbery.

Now, before you smash your Ring Video Doorbell and swear off all technology, there are things you can do to prevent people from hacking smart home devices.

1. Be Smart with Your Devices

Preventing people from hacking smart home devices starts with the devices you choose. When you’re designing your smart home system, get devices that have built-in security features. Many major brands do, but some are safer than others. You will want to do your research and find devices that are less vulnerable. If you’ve already built your system and find out you chose less secure devices, it may be time to upgrade.

Whatever devices you end up using, you will regularly want to check for software and firmware updates. Often, hackers can attack outdated encryption algorithms to get into devices. If you keep yours updated, that’s one less thing hackers can use against you.

2. Be Smart with Your Logins

If you have weak logins, it will be easier for a hacker to get into your devices and the accounts associated with them. Use strong passwords, and don’t use the same password on multiple accounts. If you do, a hacker will only need to crack one password. Then, they can easily get into all your other accounts that use that password. Have you been reusing the same password because you know you won’t remember a bunch of different passwords? A password manager app is a great way of securely storing your passwords so you can look them up rather than going through the “forgot password” process whenever you need to log in.

To add another layer of security, use two-factor verification wherever possible. This way, a hacker might crack the password to one of your accounts, but they won’t get the text or email code they need to complete the login.

3. Be Smart with Wi-Fi

Sometimes, hackers will access smart devices and use this as a bridge into hacking laptops and other devices that may contain more personal information than your smart fridge does. To prevent this, you may want to set up a secondary network for guests and smart home devices that is separate from the network you use for your computers. When connecting devices to this smart home network, use PoE (Power over Ethernet) connections rather than Wi-Fi as much as possible. This adds an extra layer of security, making it so a hacker would need to go through the added step of figuring out how to get through your network’s firewall before they would be able to start trying to hack into the device. When you are away from home, never use public networks to remotely access your smart home devices. This makes a hacker’s job even easier. Instead, use your cellular data, a far safer method than the unsecured public networks.

In the case of your home security system, you can prevent aspects of it from being connected to your network altogether if you get a cellular monitoring system rather than one with a Wi-Fi connection. With cellular monitoring, a cellular module is built into the control panel, and it uses cellular and radio-based technology to communicate with the sensors rather than Wi-Fi. This makes it so hackers can’t affect your alarm system by hacking into your Wi-Fi network, and they can’t turn it off by cutting power or phone lines. Will cellular monitoring, you will know your home is always protected when you are away from home.

Make Your Sliding Glass Door Safer

People tend to put great effort into making sure their front door is secure. Most have a keyed entry doorknob and dead a bolt. Then, some upgrade to smart locks and install a video doorbell for extra safety. Others may add burglar bars. Yet, with all this attention to front door security, many overlook the vulnerability of the glass sliding door in the back. Most glass is simple to break, the basic latch locks are easy to finagle, and they can be pulled off the track from outside. So what can you do to make your sliding glass door safer and less of a target? Here are five ideas.

1. Blocking Bar

This is one of the oldest tricks in the book, but people still use it as a way of making a sliding glass door safer because it’s still effective. Get a stick that is half an inch shorter than the distance between the door and the door jamb and place it in the track. This will prevent anyone from sliding the door open, even if they managed to disable the lock. You can make one as simple as getting a cheap broom, cutting off the handle, and making the right size. If you would prefer a more aesthetic option, you can find decorative blocking bars online.

The main downside to blocking bars is that it can be annoying or difficult for some people to bend down and remove the bar whenever they want to go out the door, especially if you use the door frequently. (Looking at you, cat. Do you want to be in or out? Make up your mind already). If you want a solution that is more convenient in the long run and don’t mind a slightly more involved installation, you could install a security bar. These are higher up and swing up and down to block and unblock the door.

2. Alternative Lock System

As an alternate solution or in addition to barricading the door, you could upgrade the latch to a better lock. A double bolt lock especially will be far more secure than a basic latch and make your sliding glass door safer.

3. Get a Security System

Burglars are more likely to target homes without a security system, so getting a security system and placing the cameras and ya­rd sign in conspicuous locations automatically makes your home safer.

4. Door Sensor

As part of your home security package, install a door sensor on your sliding door. This way, you will always know when someone goes in or out while you are home, and it will trigger the alarm system if someone opens the door while you are away and have the alarm armed. Additionally, should someone try removing the door from the track to get in, they will move the sensor, and it will likewise notify you or trigger the alarm.

5. Glass Break Sensor

An easy way for a burglar to bypass a door sensor would be to simply break the glass, but if you install a glass break sensor, it will also trigger the alarm should the would-be burglar try this.

Four Things to Do in Denver

Did you know that even though Wise Home Solutions is headquartered in Utah, we provide home security and home automation services in six other states: Arizona, California, Colorado, Idaho, Nevada, and Texas? Of those states, today we would like to briefly highlight Colorado.

Situated in the Mountain States Region, Colorado is widely known for its scenic landscapes and the variety of outdoor activities available at its four national parks and other areas of abundant nature. On a vacation to Colorado, you could go hiking, camping, skiing, or even sand surfing (unless you don’t like sand because it’s coarse and rough and irritating, and it gets everywhere). For those who aren’t the outdoorsy type, Colorado still has a lot to offer, especially in its metropolitan areas. If your vacation takes you to the capital or you live in the area, here are ideas of four things to do in Denver.

1. The Denver Botanic Gardens

With more than twenty-four acres of gardens, the Denver Botanic Gardens are a great place to explore natural beauty without leaving the comfort of the city. You can also get a glimpse of the world without leaving Colorado through the various internationally-inspired gardens. Other areas feature ornamental gardens, water gardens, and plants native to Colorado.

Visitors will find an impressive tropical display at the Boettcher Memorial Tropical Conservatory. Among other unique plants, it houses a corpse flower. These rare flowers only bloom once every seven to nine years, and the blooms only last 24 to 36 hours. Though chances are you won’t see the flower in bloom during your visit, you can see where it’s growing on your way through the conservatory. You may consider it a good thing if the flower isn’t in bloom. Then, you don’t have to find out for yourself why the Denver Botanic Gardens named their corpse flower “Stinky.”

2. The Denver Museum of Nature and Science

For an exciting and educational afternoon, stop by the Denver Museum of Nature and Science. You can go on a fun, interactive exploration through history starting with the fossils and displays in the Prehistoric Journey exhibit. A few rooms away, you’ll find an exhibit of Ancient Egyptian artifacts featuring two mummies that are on permanent loan to the museum. A touch table enables visitors to digitally “unwrap” the mummies’ stories. You can then learn about present-day wildlife and cultures in the Wildlife Halls and the Crane Hall of North American Indian cultures on your way to exploring the future possibilities presented by the Space Odyssey exhibit.

The museum also has a discovery zone for your curious kids and an IMAX Theatre, and you won’t want to miss the special exhibitions. These are always something different and always interesting, well-presented, and enjoyable for the whole family.

3. The Denver Mint

For a unique, behind-the-scenes experience, you can go on a tour of the U.S. Mint facility in Denver. You’ll learn about the history of the Mint and watch the full process of how coins are made. You won’t leave with fewer coins than you went in with because this money tour doesn’t cost any money.

Unfortunately, tours are temporarily unavailable as of March 2020. They have not yet reopened. However, it’s something to note in case you’re in the area when tours are available again. You’ll want to take advantage of this entertaining and informative opportunity. For now, there is an interactive virtual tour available.

4. Shopping and Dining

Denver’s numerous malls and shopping districts have something for everyone and all budgets. You’ll find everything from high-end designer stores to neighborhood boutiques. When you’re hungry following an afternoon of shopping, you’ll find just as many great places to eat.

If you like Italian food, there’s no better place to stop for dinner than Cinzetti’s, an all-you-can-eat Italian buffet in a Tuscan village setting. Buffets tend to get a bad rep, but at Cinzetti’s, you’ll only get the best quality food that will make you want to go back for seconds (and thirds, fourths, fifths, etc.) until you’ve eaten more than you do at Thanksgiving. Technically, Cinzetti’s is not in Denver, but it’s close and well worth the short drive to Northglenn.

Four Smart Home Devices You Need to Make Your Home Safe for Kids

,

With the ability to change the color and texture of their skin, octopuses can expertly blend in with their surroundings. They are masters of evasion that can swim at speeds up to 25 mph in short bursts when they need to make a quick escape, and they can squeeze through spaces as small as an inch in diameter. They could be considered one of the most elusive creatures on Earth, though parents may argue that a small child bursting with energy is far more difficult to keep track of even when you devote your full attention to them.

It can be frustrating when we put so much into making sure our kids are well-cared for and safe, but it feels like they’re trying to be little masters of evasion so they can get into trouble. Luckily, there are technologies today that can help. If you have young children, here are four smart home devices you need to make your home safe for kids.

1. Door Sensors

After all that work you put into childproofing your house to make it safe for kids, you may find that your kids have figured out how to get past your cabinet locks. This probably won’t happen when they’re very young. However, they’re inevitably going to reach an age where they’re still young enough you don’t want them getting into the cleaning supplies, medicine cabinet, and other areas, but they’re old and clever enough that no child lock is going to be a hindrance.

When this time comes, you may want to install door sensors on the cabinets and doors to areas you’ve told your kids are a no-no. Then, when they get curious and go exploring while you’re not looking, you’ll get an alert that they’ve opened the cabinet or door, and you can intervene before they can cause any trouble.

2. Smart Locks

When your kids get old enough to come and go on their own, you may want to give them a way of getting in and out of the house on their own. That way, if you intended to return from the store before they get home from school but you’re stuck in traffic, they won’t be stuck out in the snow until you arrive to let them in. You could give them a house key, but chances are, they’ll forget to take it with them or they’ll lose it. As an easier, more reliable alternative, you could get a smart lock. Then, your kids don’t have to keep track of keys. you can simply give them a code that’s easy to remember, and they can use that.

Do you have a social butterfly who tends to be blabby? Chances are, you know they wouldn’t be able to keep code or secret no matter how much you emphasize the importance of not telling anyone, and you don’t want all their friends to have easy access to your house. In this case, you could get a smart lock with fingerprint recognition. These usually have a code option, too, but there’s no need to share the code with your kids. They can simply get in with their finger.

Another advantage of smart locks is that you don’t need to worry about if your kids remember to lock the door when they leave. Some smart locks have an auto-lock feature, and you can program the door to automatically lock after a set interval. If you don’t have a lock with an auto-lock feature, you may be able to manually check the app on your phone and lock the door remotely if you find the kids forgot.

3. Interior Cameras

Usually, we think of security cameras as a way of combating outside threats. They can also be a good way of making sure your family is safe while they’re inside the home. You can’t be in the same room as them all the time. Even if you could, you’d still need a break on occasion.

Maybe you get together with some friends for game night, and you send all the kids to play together in the playroom while the grownups play their tabletop RPG. While your party is fighting a dragon, you can check the cameras every now and then to make sure the kids aren’t fighting amongst themselves. On another occasion, you and your partner could be out for date night, and you’ve recently found a new babysitter. You could check the cameras here and there to make sure things are going okay at home.

4. Robotic Vacuum

Especially when kids are younger, they like putting things in their mouths. You don’t want them making a snack out of something bad they found on the ground before you can intervene. Instead, at the press of a button or a command to the voice assistant your robotic vacuum connects with, you can send your robotic vacuum to eliminate any small pebbles that got tracked into the house, those leaves your house plant dropped, and so forth before your kids find them.

You could vacuum manually, but a robotic vacuum saves you time when you’re already swamped. Plus, you won’t run into the dilemma of cleaning taking twice as long when your kids decide they want to help. Now, you’re not just vacuuming the floor. You’re dodging the kid who keeps running in front of the vacuum and minding the cord so your kids don’t trip on it. If you have a robotic vacuum, you can take your kids to a different part of the house and play with them while the vacuum does the work. Your kids are safe and out of the way of the vacuum, and you have one less chore to worry about.

The less you have to worry about, the more time you have to enjoy raising your family. They grow up fast, almost as fast as technology changes. For now, use the technology currently available to make your job as a parent easier and to keep your kids safer.